Introduction React and SharePoint Framework (SPFx) are popular technologies used in modern web development, especially for building user interfaces and custom web parts in SharePoint. Preparing for interviews involving these technologies requires a solid understanding of core concepts, practical scenarios, and coding proficiency. In this blog, we’ll cover essential interview questions, different scenarios, and code examples to help you ace your React and SPFx interviews. Section 1: React Interview Questions 1. What is the Virtual DOM, and how does it improve performance in React? Scenario: Imagine you’re building a dashboard with multiple widgets that update frequently. How would React's Virtual DOM help optimize performance in this case? Explanation: React uses a Virtual DOM, an in-memory representation of the real DOM. When the state of an element changes, React updates the Virtual DOM first. It then calculates the difference (diffing) between the previous and current states o...
Get link
Facebook
X
Pinterest
Email
Other Apps
Microsoft Word add-in with header and footer using JavaScript
Get link
Facebook
X
Pinterest
Email
Other Apps
-
Microsoft Word is a powerful word-processing tool that is widely used by professionals and individuals alike. One of its most useful features is the ability to add headers and footers to documents, which can include page numbers, document titles, and other important information.
In this blog post, we will walk through the process of creating a Microsoft Word add-in using JavaScript that allows users to easily add and customize headers and footers in their documents.
Step 1: Set Up Your Environment
To get started, you will need to set up your development environment. This will require you to have Microsoft Visual Studio installed on your computer, as well as the Microsoft Office Developer Tools for Visual Studio.
Once you have these tools installed, create a new project and select the "Office/SharePoint" template. This will provide you with the necessary files and tools to create your Word add-in.
Step 2: Create a New Command
Next, you will need to create a new command that will be used to launch your add-in. To do this, open the "Commands" folder in your project and right-click to add a new item. Choose "Office Add-in Command" from the list of available templates.
In the "Add New Item" dialog, give your command a name, such as "Add Header/Footer". This will create a new XML file that contains the details of your command.
Step 3: Define Your Command UI
Once you have created your command, you will need to define its user interface. This involves specifying the button icon, text, and tooltip that will be displayed in the Word ribbon.
To do this, open the XML file for your command and modify the "Control" section to include your desired UI elements. For example, you might add the following code:
This code defines a button with a label, tooltip, and icon that will launch a task pane when clicked.
Step 4: Create Your Task Pane
The task pane is where your add-in's user interface will be displayed. To create your task pane, add a new HTML file to your project and give it a name, such as "header-footer.html".
In this file, you can add your UI elements, such as input fields, dropdown menus, and buttons. You can also use JavaScript to interact with the Word document and manipulate the header and footer content.
Step 5: Add Your JavaScript Code
Finally, you will need to add your JavaScript code to your task pane. This code will handle interactions with the Word document and update the header and footer content.
For example, you might add the following code to update the header content with the current date:
Introduction React and SharePoint Framework (SPFx) are popular technologies used in modern web development, especially for building user interfaces and custom web parts in SharePoint. Preparing for interviews involving these technologies requires a solid understanding of core concepts, practical scenarios, and coding proficiency. In this blog, we’ll cover essential interview questions, different scenarios, and code examples to help you ace your React and SPFx interviews. Section 1: React Interview Questions 1. What is the Virtual DOM, and how does it improve performance in React? Scenario: Imagine you’re building a dashboard with multiple widgets that update frequently. How would React's Virtual DOM help optimize performance in this case? Explanation: React uses a Virtual DOM, an in-memory representation of the real DOM. When the state of an element changes, React updates the Virtual DOM first. It then calculates the difference (diffing) between the previous and current states o...
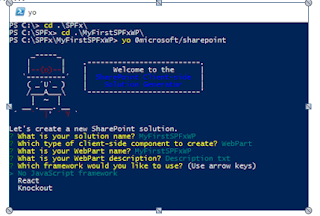
Basics of Sharepoint Framework Webparts This post is intended to share my knowledge on basics of sharepoint framework webparts. Below are the tasks we address: 1. Why sharepoint framework (SPFx). 2. How to setup a machine for it 3. How to develop your first SPFx webpart 4. How to deploy it to your SPO. 5. How to Consume it on client SPO site. 6. How to upgrade your SPFx app/webpart. Why SPFx? Let’s not reinvent the wheel. Office Dev center already provided great into and explanation on why SPFx. Read it here. In my experience here are the facts which drives me for SPFx: 1. Best dev approach for SPO client side webpart. 2. Open source tool support, like NodeJS, Gulp, Yeoman and many javascript frameworks. 3. Responsive UI support for client side webparts. Thus support mobile and tablet modes. 4. Intuitive upgrade process. How to setup dev environment? Again read this material from Office Dev article here . To summarize, below are the commands need to...
Comments
Post a Comment